Showing posts with label craft. Show all posts

Sunday, July 24, 2016

My works. Pt. 1

Hey Invaders! It's been a while since I haven't posted in this blog. I'm going to show you my recent painting and drawing.

I want to let you know that I only paint or draw when I feel inspired... Honestly, I don't know what or who makes me feel inspired to put into action my artsy side. There are times when I see myself staring into blank space, thoughts like "I feel inspired! ðŸ’• ".. " I want to draw! ✏️ " ... "I want to paint!  ðŸŽ¨ " instantly pop in my head out of nowhere. ðŸ’¨

Before I show you my our paintings I just wanna tell you a little background story about how  I  we came up with that painting. Last month, I made a new friend, both of us are willing to make our friendship stronger. We can't be with each other everyday cos of schedule conflicts, but we hang out once in a while. I mentioned to her that I paint, she asked me to show her my works, I did, and she liked them. She hinted that she wants me to teach her how to paint, but I told her that I'm not a pro and I am a self-taught artist (wait.. am I an artist? lol), who never took a single drawing or painting course in my life. She still insisted that she wanted me to teach her. I brought my painting materials and went to her place, and I also saved some screenshot of paintings that I thought would be easy for a beginner.

On Pinterest, I can see lots of similar images/paintings of what we painted that's why I can't address who's the original artist.  It was my first time to instruct someone how to paint, and even though it's a non-complex painting, I still had a hard time to explain what she should do. Half-way of painting, she said that she just messed up the canvas, so she asked me to fix her mistakes / enhance her work. Though I did fifty percent of her painting, I still insist that it's her painting not mine and I want her to keep it as a token of our budding friendship ðŸ‘­.

Here's what we came up with:


We used 9x12 inches stretched canvas that only cost around 100 Php each (not more than $2.50). Yes! it's very inexpensive, but the quality is pretty good. It's not imported, it's manufactured locally, and I think that's the reason why it's inexpensive. For the paint, we used primary colors (+black and white) of tempera paint. I just mixed some paints to come up to our desired colors. Overall, we're happy with our painting. Now, our paintings are hanging on our bedroom walls.


My next post will about my latest drawing :) See ya <3

Sunday, May 1, 2016

Update ~01

HEY INVADERS!!


It's been a long time since I haven't written a blog post. Sorry for that :). A lot of things happened in the past months. I was busy doing loaaaaaaddddsssss of school stuff, I faced one of the biggest challenge of being an Internal Auditing student (.. and thank God because I passed! Wooo..), and I also turned 18!!! Am I an adult now? Honestly, I feel that I'm still 16 . 

Anyways, It's summer vacation, and it means that I have more time to do the things that I love to do :) It involves (1) watching YouTube videos (my fav youtubers are Alex Wassabi, LaurDiy, Lazyron Studios, ilikeweylie, and a lot more!!), (2) watching Korean dramas and anime, (3) playing The Sims 3 (So sad cos I still haven't got The Sims 4), (4) painting and drawing random subjects, (5) and of course doing crafts and DIY projects that I also love sharing with you <3 

Ahhh .. It feels good to be back! I'll devote my free time to work on this blog, so stay tuned next week for a new DIY project :) That's all! See ya ;)

Monday, September 14, 2015

Free Printable Bookmarks - Quotes


Hey Invader!! I made 4 simple printable bookmarks for you. The designs are very simple, and I put some quotes to help you become inspired :) 


Just click the photo itself to download the bookmark of your choice. Print it in a thick paper and cut.


Note:  They are free for personal use only, and not for commercial use.


Click HERE to download Bookmark 1


Click HERE to download Bookmark 2


Click HERE to download Bookmark 3


Click HERE to download Bookmark 4


 I hope you'll like them <3

Want more free printable bookmarks? Click HERE


Thursday, July 30, 2015

DIY Notepad

Notepad is a must for me! I use it every single day. I write there my to-do lists, things to bring, phone numbers, etc.

A new semester started last month, so I need a brand new notepad. I look for a notepad at the craft store nearby, but I can't find the size and design I want. Since I'm a crafty gal, I've decided to customize my notepad.


Things you'll need are:


- Stack of paper
- Thin piece of cardboard


- Glue
- Paint brush
- Binder clips
- Precision knife / scissors
- Pencil

Steps:
  • First, you'll need your paper. You can use a plain paper, but if you want ruled paper you can print by clicking HERE. Once you've got your paper, cut it according to the size you prefer. Mine is 3.5 by 3.5 inches. 
  • Next, you'll need a cardboard (from Kleenex box, cereal box, or shoe box). I got mine from a shoe box. Using a pencil, trace the size of the paper onto the cardboard. You'll need two cardboards, one for the back and one for the cover. Cut it out using precision knife or scissors.


  • Stack your notepad. 1 cardboard goes on the bottom, stack of ruled paper on the middle, and 1 cardboard on the top for its cover. Tap the edges on a flat surface so that one side is as flat as it can be. 


  • Once they're all stacked nicely, secure it with a couple binder clips. You can also add another sheet of paper on top and bottom of the stack to protect the notepad from glue drips.

  • With the brush, apply 2-3 coats of glue on the side where the notepad will be held together. Let it dry completely.


  • Once the glue is dried, peel off the paper you put on top and bottom of the stack. Now for the spine, cut a strip of craft paper. Remember that the size depends on your notepad, mine is 1.5 inches wide and 3.5 inches long.
  • Place the strip of paper over the spine, and crease the edges to mark you spot. Glue the strip onto the spine of the notepad. Let it dry.


  • Done! You now have your customized peel off notepad!


❤️‍❤️‍❤️‍


Wednesday, July 8, 2015

DIY Corner Bookmarks

I've seen tons of these cute bookmarks on Pinterest. Since I'm reading a new book, I've decided to make my own bookmarks too :) . These bookmarks add a fun spice to your book's persona.


It's very easy to do, the materials are very basic and it can be made in less than 5 minutes. Let's start!


Materials:


- Paper  
- Glue/Paste 
- Pencil
- Ruler
- Scissors


Steps: 


  • Choose a colored paper you want to make a bookmark from. Cut a 12 x 12 cm square. 

  • Using a ruler and a pencil, draw a template like this :


  • Use your scissors to cut out the shaded triangles. 

  • It should look like this:


    • Fold the two triangles with the guide of the lines.


    • Apply glue between them. Let it dry.


    • You can now decorate it in any way you want!.

    Here's mine :) 
    • I've decided to make a cute crocodile. I used colored papers and cut some circles to make an eyes. I also cut a zigzag for its sharp teeth.


    • I also added two small circles for the nose. I used glue to attach them. Tadaaa~ 


    Meet Mr. Croco :)
    ~~~~~~~~~~~~~~~~~~~~~~~~~~~~~~~~~~~~~~~~~~~~~~
    Here's more...
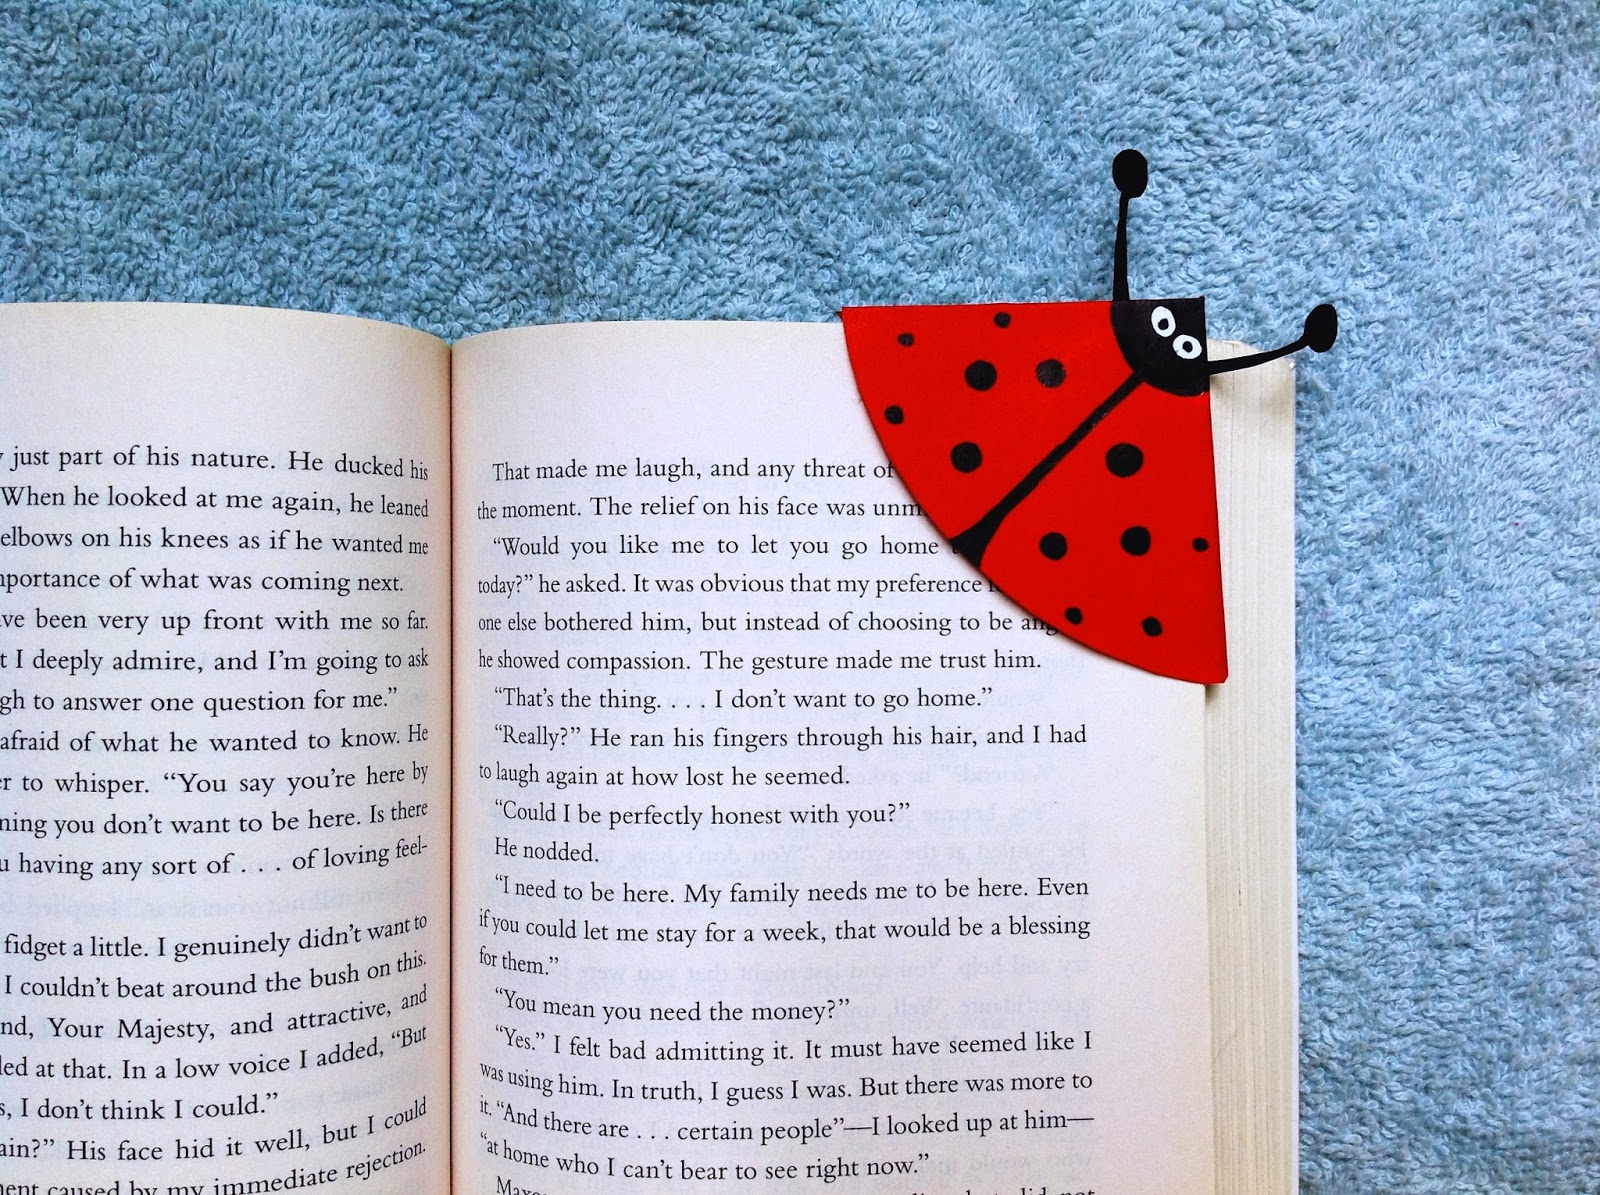
    • I've decided to create a lady bug design. I just did the same steps above on how to make this corner bookmark. The only difference is I flipped it over.


    • Using scissors, I cut the end in a curved shape. I used a black colored paper and cut an antenna shape. I used a black colored pen to add more details.


    • Sooooo cuteeee!


    ~~~~~~~~~~~~~~~~~~~~~~~~~~~~~~~~~~~~~~~~~~~~~~

    ... And more!

    • It's so much fun to do! So I've created more. Take a look :)


    What are you waiting for? Make your own too! You can browse on Pinterest to get some inspirations :) Don't be afraid to experiment. Good luck!  


    Friday, May 22, 2015

    DIY Cork board Calendar

    Most students are going back to school next month (June 2015). Today I'm going to show you how to make this easy cork board calendar/planner! 


    Don't worry it's very easy to do! - plus, it's budget friendly :)

    Materials:


                                        - Cork Board  (18x12in)           - Colored pens                   
                                        - Colored Papers                       - Push pins                          
                                        - Scissors / Craft knife              - Sticky notes (optional)     
                                        - Pencil                                      - Washi tapes (optional)
                                        - Ruler                                       - Stickers (optional)
                                         - Scotch tape                             - Mounting tape

    Steps:

    • Use a washi tape as a border of the calendar. Don't occupy the whole surface because you'll use the right part for "Notes" area.


    • Write the name of the month and year on a colored paper. Cut it (mine is 7.5 x 1 in). Use push pins to attach it to the cork.

    • If you have a sticky notes (with the size you prefer), just use it. But since I don't have the size I want, I just made my own. Make sure that you have a real calendar, you'll use it as a pattern for you to know how many days there are and on what day you should place each dates. 
    • Since I'm working on the month June, I cut 30 rectangles (40 x 45 cm) for the dates. Color code it according to your schedule. Here's mine: Fuchsia- sunday, Yellow- rest day, Pink- tue&fri class subjects, Green- wed&sat class subjects.


    • Use a scotch tape to attach the boxes to the cork board. The good thing about scotch tape, is that you can easily peel it off for you to make another calendar next month.


    • For the names of the days, I use an arrow sticky notes. Use colored pens to write the days (sun, mon, tue..).  On the upper left part of each boxes, write the dates (make it small, because you'll put your to-do's on that empty space).


    • Now, work on empty right part of the cork board. Using a colored paper, write a small "Notes", cut it and use a scotch tape to attach it. Next, use a ruled paper and cut a lengthwise rectangle (2 x 5.5 in). Use push pins to attach it to the cork board. 

    • Lastly, add some finishing touches like stickers or any decorative pieces. And it's done!
          TADAAAAAAA~

    (Use a  mounting tape to hang your calendar against the wall. The mounting tape is strong enough to hold the cork board.)

    What are you waiting for? Make your own now! Don't be afraid to explore the crafty side of yours. 

    Post your creations on Instagram and hashtag " #PaperInvader ". I would love to see them <3
    Leave a comment below telling me your thoughts about this DIY project. :)