Most students are going back to school next month (June 2015). Today I'm going to show you how to make this easy cork board calendar/planner!
Don't worry it's very easy to do! - plus, it's budget friendly :)
Materials:
- Cork Board (18x12in) - Colored pens
- Colored Papers - Push pins
- Scissors / Craft knife - Sticky notes (optional)
- Pencil - Washi tapes (optional)
- Ruler - Stickers (optional)
- Scotch tape - Mounting tape
- Pencil - Washi tapes (optional)
- Ruler - Stickers (optional)
- Scotch tape - Mounting tape
Steps:
- Use a washi tape as a border of the calendar. Don't occupy the whole surface because you'll use the right part for "Notes" area.
- Write the name of the month and year on a colored paper. Cut it (mine is 7.5 x 1 in). Use push pins to attach it to the cork.
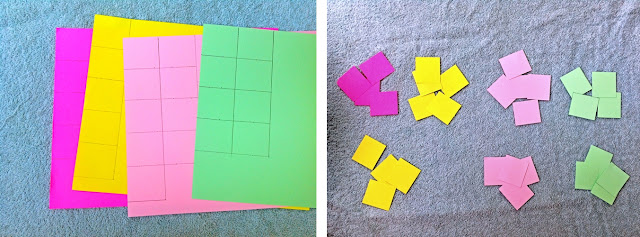
- If you have a sticky notes (with the size you prefer), just use it. But since I don't have the size I want, I just made my own. Make sure that you have a real calendar, you'll use it as a pattern for you to know how many days there are and on what day you should place each dates.
- Since I'm working on the month June, I cut 30 rectangles (40 x 45 cm) for the dates. Color code it according to your schedule. Here's mine: Fuchsia- sunday, Yellow- rest day, Pink- tue&fri class subjects, Green- wed&sat class subjects.

- Use a scotch tape to attach the boxes to the cork board. The good thing about scotch tape, is that you can easily peel it off for you to make another calendar next month.
- For the names of the days, I use an arrow sticky notes. Use colored pens to write the days (sun, mon, tue..). On the upper left part of each boxes, write the dates (make it small, because you'll put your to-do's on that empty space).
- Now, work on empty right part of the cork board. Using a colored paper, write a small "Notes", cut it and use a scotch tape to attach it. Next, use a ruled paper and cut a lengthwise rectangle (2 x 5.5 in). Use push pins to attach it to the cork board.
- Lastly, add some finishing touches like stickers or any decorative pieces. And it's done!
TADAAAAAAA~
(Use a mounting tape to hang your calendar against the wall. The mounting tape is strong enough to hold the cork board.)
What are you waiting for? Make your own now! Don't be afraid to explore the crafty side of yours.
Post your creations on Instagram and hashtag " #PaperInvader ". I would love to see them <3
Post your creations on Instagram and hashtag " #PaperInvader ". I would love to see them <3
Leave a comment below telling me your thoughts about this DIY project. :)


Great Idea :) I'll recreate this.
ReplyDeleteThanks <3
Delete